!Unit 6 3D Work
Context
For Unit 6, as a class we have been asked to produce a 3D image. This could be anything from a 3D Dimension/model; to a 3D Image, something that comes off the page. For my idea I am going to create a 3D image and buy a pair of 3D glasses so my image will then come out the paper just like a 3D film, however in a still image. Using Photoshop I am going to edit my images of portraits, which I have taken in the set up studio at the back of my classroom. I took 3 images of Chloe and Jada. My images are full length body portraits because I feel they will be more effective when turing it into 3D.


Final Outcome


Evaluation
For Unit 6, as a class we have been asked to produce a 3D image. This could be anything from a 3D Dimension/model; to a 3D Image, something that comes off the page. For my idea I am going to create a 3D image and buy a pair of 3D glasses so my image will then come out the paper just like a 3D film, however in a still image. Using Photoshop I am going to edit my images of portraits, which I have taken in the set up studio at the back of my classroom. I took 3 images of Chloe and Jada. My images are full length body portraits because I feel they will be more effective when turing it into 3D.
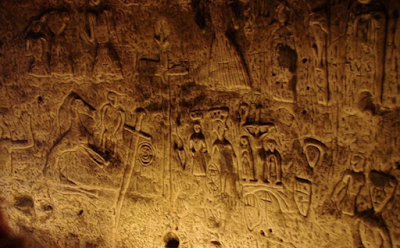
The history of 3D art may have begun with the recognition of likenesses in natural objects for example trees, rocks and ivory, which were modified to enhance that likeness. This early interest in 3D can be seen even in the caves that were home to Upper Paleolithic Europeans. These hunter-gatherers painted stick figures and their abstract images of prey on cave walls, however fleshed out the human anatomy in the totems they carved from ivory and other materials. This was how a 3D image was created/invented. Below is an example of a 3D image that was found on the cave walls and what it looked like.

Above is a 3D Digital example, the image above shows what it looks like when you don't wear 3D glasses. The purpose of the image is to wear 3D glasses when you look at the image and the photo will become a 3D digital image. This is something I am planning on creating for my 3D image. I will complete this using Photoshop to edit my images creating the 3D effect. What makes a 3D image? A 3D image is a picture that has height, width and depth, something that comes off the page. So the example above when you wear 3D glasses the little boy in the image will come out off the page almost like its realistic. This is something I am happy to try and experiment with.


Above is a 3D Digital example, the image above shows what it looks like when you don't wear 3D glasses. The purpose of the image is to wear 3D glasses when you look at the image and the photo will become a 3D digital image. This is something I am planning on creating for my 3D image. I will complete this using Photoshop to edit my images creating the 3D effect. What makes a 3D image? A 3D image is a picture that has height, width and depth, something that comes off the page. So the example above when you wear 3D glasses the little boy in the image will come out off the page almost like its realistic. This is something I am happy to try and experiment with.
Research


For 3D Digital I have completed some research into finding some photographers that capture portrait images and turns them into a 3D Dimension. Above is a photographer who does something very similar to what I was planning. They take a series of studio photos including celebrities and non-celebrities in a studio using high key lighting- a white background with two full lights. They then edit the images in Photoshop giving the images the blue and red effect, which turns the image into a 3D Dimension when you wear 3D glasses. These images are known as Anaglyph images.
Planning & Production
Over the last week I have been capturing some portrait images using the studio set up in the classroom. I also booked out the main studio to capture some images. Finalising my two favourite portrait images I used Photoshop to experiment and play around with the settings to create my portrait image into a 3D dimension. Below I have included a screenshot of the settings shown in Photoshop when selecting the options when making a 3D image. To do this I duplicated my image and then selecting Layer tool and selecting blending options and unticking the "R" option the image once moved then creates the blue and red effect creating the image into a 3D Digital Image.


Final Outcome


Above are my two final images that I created using Photoshop, I feel using the images of Jada worked well, using a full portrait image really creates the image to stand out a when you use the 3D glasses I think my final prints could really work successfully. I am going to print my prints of Luster paper for my finals and place on black mounting board. This will present my prints nicely for my final and with the black backing board it will help my images to stand out on top of the black.
Evaluation
For 3D Digital as a class we had to create a piece of work that was 3D. There were many options and I came up with the idea to create a set of images into 3D using Photoshop and a pair of old fashioned 3D Glasses. I made my work using Photoshop. I captured a series of images in the studio and picking three of my favourite I uploaded them to Photoshop. Using the blend layer tool I unticked the red option, this option means once I move my layer to the left or right slightly a red and blue effect is created, this effect is what makes my image to become 3D. Once you wear the 3D glasses that red and blue fade will disappear leaving the person in the photo to come out of the page.
Creating my 3D work I came across a few complications when using Photoshop. I find Photoshop hard to use already and when I went to edit my images I didn’t have a clue on where to start. Alex knew I was struggling and helped me create my images into 3D by showing me the steps. Once Alex showed me how to complete the first image I had a stronger idea on what to do for the rest. Other than this creating my 3D Digital was successful and the outcome I feel is great and something I am happy with.
Before taking my images I undertook a small amount of research. I found researching this was complicating because there are so many ideas for 3D Digital and I couldn’t find a specific photographer that did artwork like this. I found a image on google showing the examples and I felt this was something I wanted to try so I went ahead captured some images using the studio and experimented from there.
Overall my 3D Digital was a success and if I could do it again I would use different and more images to show a range of experimentation. For example I only used three images all images showing the full body of my models, next time I will use some portrait images and some images showing the models waist up. My final outcome, however I am very happy with. I feel my work is very successful and shows a clear understanding of how a 3D image works and shows I have experimented and shows I understood the task in hand clear. Using a paid of 3D images my images will work well and shows depth, width and height coming off the page.
Comments
Post a Comment